2016-09-13 2nd Flight and Project End
.
1/4 Scale vLazair 2nd Flight
2016-09-11 First Flight
.
1/4 Scale vLazair First Flight
2016-09-03 Runway Testing
.

1/4 Scale vLazair Runway Testing
2016-09-02 Hover Testing
.
1/4 Scale vLazair Hover Test
2016-08-14 Texas Transfer
.

1/4 Scale vLazair in Texas
2016-07-31 Door Operation
.
1/4 Scale vLazair Door Operation
2016-07-28 Gas Motor Test
.
1/4 Scale vLazair Gas Motor Test
2016-07-27 Fuel Bladders
.
1/4 Scale vLazair Fuel Bladder
2016-07-23 Yaw Tuning
.
1/4 Scale vLazair Yaw Tuned
2016-07-22 Pitch Tuning
It has been a year since I last posted an update. I guess when I am spending my own money and my own time on a project I can have that luxury. Here is a video of the pitch axis tuning setup that I used:
1/4 Scale vLazair Pitch Tuned
2016-06-15 Frustrating
It has been a frustrating few weeks since the 3D parts arrived. Functional assembly has been delayed while I finalize the choice of multirotor flight controller, what firmware to use in it and in choosing the electric motor controllers.
The good news is that I am learning a lot and that when I finally do functionally assemble the model, it will have a much better chance of working without a lot of tedious revisions.
Currently I am testing the SPracing F3 EVO flight controller and exploring whether the iNavFlight firmware fork of CleanFlight can be set up for all my needs. Because this firmware is open source on GitHub, I will be able to modify it at the nuts and bolts level if I need to. At this point, only small source code changes appear to be desired and they are possible even at my programming skill level. In addition to the flight controllers gyros and accelerometers, iNavFlight firmware works with external high accuracy GPS, pressure sensors, magnetic compass sensors and even sonar if desired. The landing procedure will be to manually transition, at a safe altitude, into a 'position hold' hover (position, altitude and heading). Then, I can then just flip a switch to land. The model would then translate to a GPS landing coordinate, back down to a safe landing and turn off the electric motors without further pilot input. I have seen videos of GPS landing accuracy that is within about 2 feet of the intended spot.
I have also convinced myself that I could even write code for iNavFlight that will do automatic transitions to and from hover mode.
I am also testing a smaller, faster and easier to program motor controller, it is the DYS XMS30a. The main reason that I am switching is that it will fit better in the nacelles.
As far as the 3D parts go, generally I am still happy with them. The wings did arrive with about 1/4" up/down bends in them, one up the other down. I am not sure if this was just by less than careful cooling of them during production. Gradually I have straightened them but I am not sure if they will remain permanently straight. I just weighted them down at room temperature with a slight overbend and let them creep for a day or two. Tried heating up the side that needed stretching but they always went back to the bent state when cool. I deemed loading AND heating as too risky.
Also, I am tempted to put a layer of 100g carbon on the wings and tail surfaces to make them more rigid in bending but I will likely delay that decision until after some tether testing.
Lots of testing time too, here is a electric motor cooling test to make sure that the motor will not melt its plastic nacelle mount after 6 minutes of hover thrust. The temp stabilized at 60 degC while motor was running and rose to a maximum of 75 degC after the motor was shut down (due to the heat coming out of the inside of the motor after the cooling air was removed).

1/4 Scale vLazair First Assembly
2016-05-25 Lots of parts
2016-05-05 First BIG Part
I received what I consider the first BIG part, the X tail assembly. Below is a picture of it with a nacelle bolted onto it. I am very happy with it and have now ordered ALL the 3D parts for the quarterscale model. They should be delivered within 2-3 weeks.
The 9x5 scaled down prop blade performed exactly as I had hoped. I am now getting the same full power thrust as my existing full scale JM1 electric motor setup on my eLazair.
We have started to ship 1/32 vLazair models, if you ordered one you should see it in the next week or two.

1/4 Scale vLazair X

vLazair 9x5 Prop Test
2016-04-18 TailGear
The vLazair is undoubtedly a modern 'tail sitter' design. This means that I have to design the tail to absorb landing loads. Since I actually have seven landing wheels on the vLazair, I want to distinguish the four wheels that are used for vertical landing by calling them the tailgear.
My goal is to be able to drop the quarter scale model in a vertical attitude from 1 foot high and absorb that energy with the tailgear in about 2 inches of shock absorber travel at a maximum of 6G's. Back in the mid-1980s when I was designing the Hystar airship, I had what I thought was a unique landing gear design for it. An advantage when you have to design an energy absorbing landing gear for a vertical landing vehicle is that the energy absorbing device does not need to have a recovery time measured in milliseconds. This is because the wheels are not bouncing at a high speed through potholes on a bumpy runway during the energy absorption. The recovery time of the energy absorbing device on the vLazair can be measured in seconds and still do its job. On the Hystar the design was such that the energy was absorbed hydraulically by pushing oil through an orifice and the recovery pressure (for extension) was governed by a 'ground touch' switch. I plan to use this concept on the full-scale vLazair, but on the quarter scale I will just have a small mechanical spring to slowly extend the tailgear after takeoff.
Here is a cutaway view of my tailgear design for the quarter scale model, there is enough detail here to figure it out completely if you have good mechanical vision! I am especially proud of the spring loaded caster mechanism. Once the tailgear is on the ground, each of the four wheels move into an offset position which allows the wheels to caster in any direction. As soon as the tail gear leaves the ground, all four wheels are spring-loaded into a zero caster offset position, this reduces drag and is aesthetically pleasing:

1/4 Scale vLazair TailGear
2016-04-17 Foldback Props
It is turning out that the hardest component to acquire for the quarter scale model are the foldback props for the electric motors.
Foldback propellers are used on powered RC gliders, the problem is, they only come in one rotational direction. On the vLazair, half of the electric propellers have to rotate clockwise and the other half have to rotate counterclockwise.
So, I am left with making my own foldback propellers. My first thoughts were to 3-D print them and then reinforce them with a layer of carbon fiber to take the loads. In the process of doing this, I came to believe that I could make a 3-D printed blade that was strong enough without the carbon reinforcement. A static pull test to destruction on a 3-D printed blade that was designed to have carbon reinforcement on it resulted in a prediction that the blade would break due to centrifugal forces at about 7500 RPM without the reinforcement. I made a test stand where I could safely test my propellers to destruction, and lo and behold, that un-reinforced blade flew apart at about 7500 RPM. The blade broke at its weakest spot which was circular in cross-section, and it was a simple matter to add a fillet to the design that would increase the strength at the failure point by 3 1/2 times. Now the blade is predicted to fail at about 13,800 RPM , which is well above the 7500 RPM that I expect to see at full throttle. Further tests are necessary and so far I've had it up to 9100 RPM without failure. Needless to say, I will be giving these propellers a wide berth until they are proven.
I'm also spending a great deal of time making sure that the quarter scale model operates at scale thrust, rpm's and torque levels so that my flight testing represents a valid test for full-scale flight predictions. Fortunately , this is a relatively simple matter because I am now able to 3-D print my electric propellers. I am currently waiting for a 9x5 3-D printed propeller to arrive so that I can achieve about 800 g of thrust at about 7500 RPM on a 3S battery as a starting point for 100% power.
Another feature of my foldback props is that they are spring loaded to the feather position which is needed when the vLazair lands horizontally on a runway with the electric motors off.
When you look at the following picture and video you will also notice two very unique features that I have incorporated into the electric power system.
The first is that I am using is a centrifugal fan on the rear of the spinner plate. This is my solution to cooling airflow problems inherent in electric flight power systems. That cooling problem is caused by the small diameter of the electric motors, relative to the spinner diameter that is needed on the propeller. The spinner is in effect blocking cooling air from the motor. This centrifugal fan is close-fitting in a hole in the cowl. The fan sucks air through the electric motor and controller inside the cowl in a direction opposite the direction of flight and exhausts the air, radially outward from the fan (or optionally deflected rearward) into the free airstream. The cowl air inlets are on the rear of the cowl, behind the motor and controller.
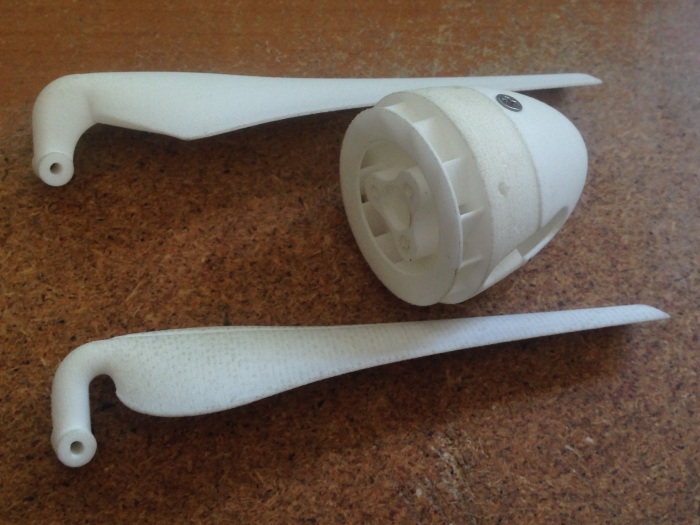
Filleted Blade, Centrifugal Fan, Blade for carbon
The second unique feature is the spring-loaded thrust line feature. During hover flight, I am countering the base torque of the Rotax gasoline motor by offsetting the thrust line of the electric motors. Preliminary calculations show that this will require about a 5° electric motor thrust line adjustment. Rather than having these motors set permanently at 5° I have decided to have the thrust line spring-loaded back to 0° for minimum drag during cruise (and also for aesthetics for people who would notice the skewed nacelles). What this means is that as soon as the electric motors are generating thrust stronger than the spring, the motor thrust line will pivot until the 5° (adjustable) stop is hit.
I was also wondering how much degradation in performance I would see if I used the 3-D printed prop blades exactly as I receive them. Their surface finish is about like 180 grit sandpaper and it is very hard to sand smooth. The powdered base material for this 3-D scintered laser process is a nylon 12. It is very tough and hard to sand and I would also have a balancing issue if I hand sanded them. In any case, the un-sanded blades are performing very well as compared to smooth fixed pitch props used on this same motor. I don't have any precise numbers on any efficiency loss due to surface roughness but I am happy with their efficiency using them 'as received'.
2016-04-11 Folding Prop Test #1
Today I had a very successful test of the 3D printed folding prop I designed for the quarter scale electric motors. Here are the results:

2016-03-20 Quarter Scale vLazair CAD
The 1/4 scale vLazair model has been drawn in full detail in 3D CAD software and is ready for 3-D printing.

1/4 Scale vLazair Full View - 2016-04-15

1/4 scale vLazair partial Xray View - 2016-03-16
2016-03-16 Kickstarter
This was the day that I launched a 30 day Kickstarter campaign to try to raise $14,000 in order to build the quarter scale vLazair model.
For many years it had been suggested to me that I try to fund my projects with Kickstarter campaigns. This was my first and probably my last attempt at that.
It appears that I underestimated the importance of having and using social networking in order to promote your own Kickstarter campaigns to people who would have an interest in the project and in yourself. Unfortunately I do not do any social networking. I do want to thank those few backers that I had.
Now it is time for Plan B on this project. I wouldn't be much of an inventor if I did not have MANY Plan B's and if I just stopped a project after a hiccup in Plan A.
Plan B is this website.
2016-02-04 The Beginning
This project began when I received a call from my good friend Dale George. It is always scary whenever I get a call from him. He tells me all the neat things he has been up to since we last talked and all the hurdles he is encountering with his projects. Then, because I am who I am, my mind seems to subconsciously think of ways that I could help with the roadblocks he encounters. A lot of times I just wake up in the morning with ideas to help. It was no different this time.
DaleG (as we agreed, we add G or K to Dale whenever there is any chance of name confusion) had been toying with the idea of using his UAVs and RC helicopters for low acreage crop dusting. In the process of my coming up with a crop dusting drone design that has unlimited endurance and capacity (that is a whole other project in itself), I realized that I could build extremely lightweight, high capacity gasoline powered electric generators using the electric motors that I have been powering my electric Lazair with, as generators instead of motors.
Then, I had the idea of combining the thrust of a gasoline aircraft motor with the thrust of many electric motors to create a vertical takeoff aircraft that could also takeoff and land horizontally. This would solve the endurance problem of an electric only aircraft by having all the cruise power come from the gasoline motor.
A breakthrough also happened when I realized that I could reduce the weight of the battery for the electric motors, by using an onboard electric generator to charge the battery in-flight after takeoff.
When I actually ran the numbers on this design, I was amazed that I could get a 1.3/1 thrust to weight ratio using existing components that I have dealt with before in the power system.
Now, I just needed an aircraft design that met my needs. I chose a tail sitter design because of its mechanical simplicity. There really was no configuration change in the aircraft between horizontal and vertical flight. The main problem I saw, was the problem that the pilot had with their frame of reference as they tried to back down to a landing in the hover mode. My solution to that was simply to have the pilot seat remain horizontal as the aircraft transitions flight modes.
Although having a rotating pilot seat does add some complexity, I prefer this to having to rotate wings and/or a number of different motors and propellers as in other designs that are currently being proposed for vertical takeoff and that also have a horizontal flight mode that use wings for lift.

2016-02-09 alternate configuration and name - TiltAir
At about this time, I came up with the name vLazair. It seemed a natural progression in the names that I have chosen for the various aircraft designs I have made in my life. My company produced about 1200 Lazair aircraft of various designations, including the Lazair Series I, Lazair Series II, Lazair Series III, Lazair 2, Lazair EC, Lazair Elite, Lazair SS, eLazair. Obviously I consider Lazair to be more of a brand than a model so vLazair continues that trend in my mind. After all, the v is for vertical flight ability, but it still has an inverted V-tail (and an upright one too :) and it still has an open cockpit (sort-of :).
Over the next four weeks, I barely slept and I was working on my computer, night and day. I analyzed the full scale design aerodynamically using XFLR5 and when I was happy with its predicted performance and stability, I began to design a one quarter scale model of it.
For the last year or two, I have been dabbling in 3-D printing. I built an extrusion process printing head for my CNC mill. I also designed and had 3-D printed commercially, a few parts using a scintered 3-D process. I have fallen in love with this scintered process and I decided to see whether it would be possible to build my quarter scale model completely out of scintered 3-D printed parts (just add hardware and fly!). Unfortunately, it is extremely hard to tell how heavy the 3-D printed 1/4 scale vLazair parts would be without having a completely designed 3-D CAD model. This 3-D CAD model of the one quarter scale aircraft consumed countless hours of my time. In the end, all the 3-D printed parts turned out to use 2,148.385 cubic centimeters of plastic and would weigh 4.4 pounds. That's great for the 13 pound all up weight 1/4 scale aircraft.
So, five weeks into the project, I had to change gears and see if I could find enough money to at least prove the vLazair concept by building and testing the 1/4 scale model.